After the account authentication function is configured, the client needs to enter a valid account and password before accessing the Internet. It supports configuring the number of concurrent clients, time period, and traffic limit.
The specific steps are as follows:
Step 1: Select the project to be configured, and click Device Config > Basic.

Step 2: Click  to add a new SSID, or click to edit a SSID. Enable the authentication function for the SSID, and set the authentication mode to Captive Portal.


Step 3: Click “or add a new portal” to create a new portal. In captive portal setting page, fill in the basic portal information, and check Account in the login options, set the portal page as needed, and then click OK.


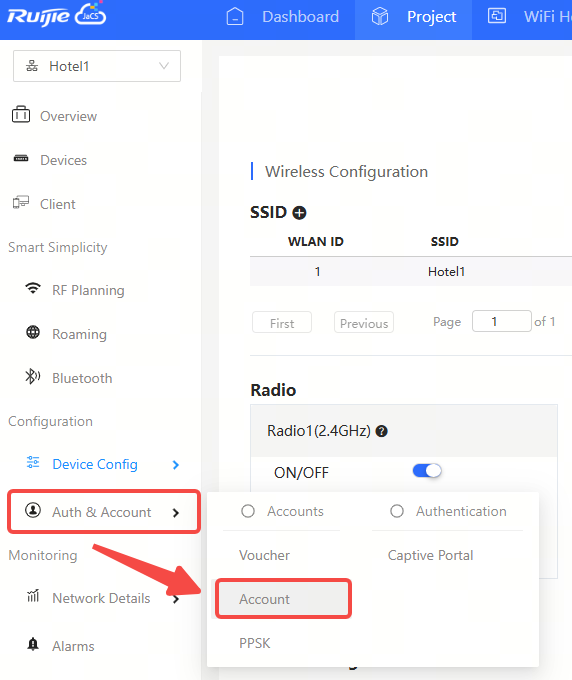
Step 4: Click Auth & Account > Account to enter the account authentication configuration interface.
Step 5: Select Manage Package > Add Profile to define an account type for your guests.

(1) Profile Name: Required. Enter a profile name. The supported name length is up to 32 characters. Numbers, letters, and underscores can be contained.
(2) Description: Optional. Up to 28 characters are supported.
(3) Concurrent Devices: Set the number of concurrent devices. Defaults: 3. Options: Unlimited/1/2/3/4/5/6/7/8/9
(4) Period: Set the validity period. During this validity period, the client is allowed to use the account and password to access the network. Defaults: 30 minutes. Options: Unlimited/30 minutes/1 hour/2 hours/1 day/2 days/1 week/2 weeks/30 days/Custom.
(5) Data Quota: Set the traffic quota. Defaults: 100MB. Options: Unlimited/100M/200M/500M/1G/2G/Custom
(6) Download Speed: Set download speed limit. Defaults: Unlimited. Options: Unlimited/256 Kbps /512 Kbps /1 Mbps/2 Mbps/5 Mbps/10 Mbps/ Custom
(7) Upload Speed: Set the upload speed limit. Defaults: Unlimited. Options: Unlimited/ 256 Kbps /512 Kbps /1 Mbps/2 Mbps/5 Mbps/10 Mbps/ Custom
Step 6: After configuring the profile, click Account to return to the account management interface.

Step 7: Click Add Account to set account information. You can set account information in batches or for a single account.


Batch settings:
① Select a profile.

② Click Download Template to download and fill in the template. You can configure up to 200 account information at a time.


(1) Account: Required. Set the account name.
(2) Password: Required. A password can be up to 32 characters and can contain letters, numbers, and underscores.
(3) Alias: Optional. Set an alias.
③ After filling in the template, click ".xls" File to upload the template. After the prompt appears, the configuration is completed.


To create a single account:
① Click Add an Account.

② After settig the account information, click Save.

(1) Account: Required. Set the account name. An account can contain letters, numbers, and underscores, and its length can be up to 32 characters.
(2) Password: Required. A password can contain letters, numbers, and underscores, and its length should range from 2 to 32 characters.
(3) Profile: Required. Select a profile.
(4) Alias: Optional. Set an alias. The alias should be between 2 and 32 characters and contain letters, numbers, and underscores.
Step 8: After the import is successful, the account information will be displayed in the account list. If you need to edit the account information, you can click the icon in the Action column to edit it; if you need to delete the account information, you can click to delete it.

With the account authentication enabled, clients will be required to enter the account name and password, and then click Login to access the network when they connect to the SSID.

全部评论